Upcycling 101: How to Repurpose a Changing Table into a Chic and Functional Dresser
See you how to repurpose a changing table into a stylish and practical dresser. Get creative and save money with this easy DIY project!
If you’re a parent, chances are you are ready to replace your little one’s changing table with a dresser. But if you already have a changing table that doubles as a dresser, you may be looking for a way to repurpose it and save money.
You can easily transform your changing table with a little creativity into a beautiful and functional dresser that can be used for years to come. In this post, I’ll share with you how to repurpose a changing table by removing the changing table topper and what to do with what’s left.
How to Repurpose a Changing Table into a Dresser
I find it very rewarding to invest your creativity and time into a piece that you know can be used for a long time. When I was expecting my daughter, like any other price conscience mother, I looked for deals for her new nursery.
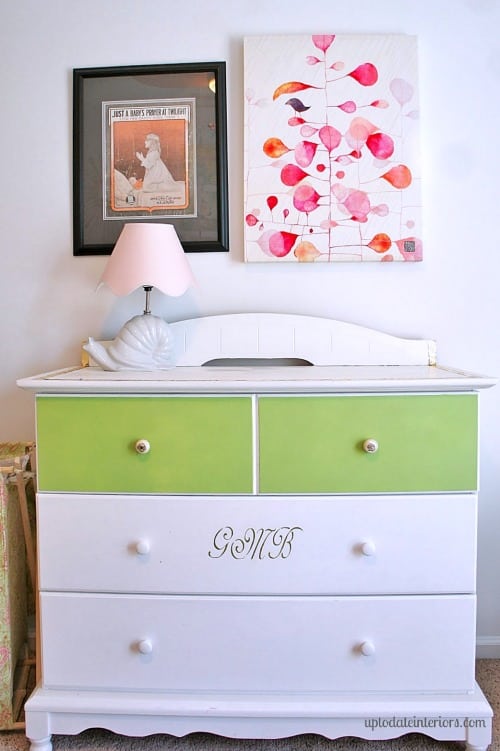
I found a BabysRUs oak changing table on Craigslist for $40. My husband painted it white for me. My sister and I added the initials using a stencil and acrylic paint.

Now my daughter is three and is transitioning into a big girl room that also doubles as a guest room. To update the changing table, I had to disassemble the top pieces and remove the front and side frame pieces. I used wood putty to fill in the screw holes and sanded the top until it was smooth.
I decided not to repaint the top piece white again but added some detail with gold leaf. You can purchase gold leaf at a craft store or online. I bought my gilding kit from www.caromalcolours.com a few years ago and it has lasted forever.
Repurpose Changing Table with Gold Leaf
Prepare the dresser by removing the changing pad frame on the front and sides. Use wood putty to fill in the holes and sand.
How to Apply Gold Leaf to Cover the Exposed Wood
- Step 1: If you want to add an embellishment of gold leaf (or silver, copper) to a piece of furniture, tape out an outline with painter’s tape as I did here as seen in the pictures below.

- Step 2: Add a base coat of paint if you want the “cracking” in the gold leaf to show with a dark color like chocolate brown. If you skip this step, you can add an extra layer of gold leaf so none of the furniture’s color is exposed.
This is the paint my gilding kit came with.

I was unable to reuse the adhesive from the kit (it is at least seven yrs old), so I pulled out my bottle of mod podge. You can make your own mod podge by mixing water and Elmers or other craft glue 50/50.
- Step 3: Use a sponge or a bristle brush to apply a thin layer of glue. The gold leaf can be tricky to work with and it is best to wear plastic gloves so as not to scratch or leave fingerprints in the gold leaf. Just take pieces of the gold leaf and gently lay it down and dab it with your finger or dry brush (I think the sponge brush works well here) working small sections at a time.

Remove the painter’s tape before adding a protective top coat. Mod Podge usually works great as a top coat to seal whatever you have applied but it can leave gold leaf looking matte. Try using a spray paint of polyurethane for a protective coat or just leave it as is.
Here is the end result. Drum roll, please!!!

Repurpose Changing Table with Paint
After my daughter got even a few more years older, we decided to give her a preteen makeover. I removed the back piece from the changing table topper, sanded the gold border smoothly, and painted the dresser mint green. This makeover will hopefully last until college!


It looks so pretty and my daughter can keep it forever!

Repurposing your changing table into a dresser is not only a fun DIY project, but it’s also a great way to save money and give an old piece of furniture a new lease on life. With a little bit of creativity, you can create a unique and stylish dresser that will fit perfectly into any room of your house.
Whether you choose to add a fresh coat of paint or new hardware, a gold-gilded border, the possibilities are endless. Don’t get rid of your changing table just yet, give it a chance to be repurposed and see how it can transform your space!

- Sunshine on a Wall: Crafting a DIY Sunburst Mirror with Skewers

 Craft your own gold DIY sunburst mirror with our easy tutorial. A budget-friendly, step-by-step guide using items you probably already have. Are you searching for a budget-friendly way to elevate your home decor? Look no further! Discover how to create a stunning DIY sunburst mirror that adds style and flair to any room without breaking…
 - How to Make an Apartment Feel Like Home: 10 Temporary Decorating Ideas
 Discover “how to make your apartment feel like home” with our expert tips! Transform your space into a cozy sanctuary effortlessly. Hey apartment dweller! Ready to banish that “temporary” vibe? As a seasoned renter and designer, I’ve helped many renters turn their temporary space into a cozy haven with easy-to-follow decorating and design tips. Let’s…
 - Try This Easy DIY Vase Decorating with Faux Succulents
 Discover how to craft a beautiful DIY vase adorned with faux succulents. Enhance your home decor affordably with this project, bringing a modern touch to any room. Looking to add a touch of modern elegance to your home decor without breaking the bank? This budget-friendly DIY succulent vase project is just what you need! Let’s…
 - DIY Clipboard Art Display with Creative and Easy Decorating Ideas
 Transform your space with a stylish clipboard art display! Learn how to elevate ordinary clipboards into chic decor pieces with a DIY guide. Are you tired of the constant struggle to keep your child’s artwork organized and proudly displayed without cluttering up your walls? Or perhaps you’re looking for a chic and budget-friendly way to…
 - How to Create Family-Friendly Interior Design: 10 Practical Tips
 Discover practical tips and creative ideas for family-friendly interior design that combines safety with style. Are you a parent who has wondered how to have your “dream home” and not have nightmares about destruction or injuries? Fear not! Ever since our kids were babies, I have always been passionate about decorating our home. Through trial…
I love the color combo. Great job!
Thank you!
This came out so pretty. We’re following from Buttercream Bake House Linky Party on Google Friends Connect. Would love to have you follow back.
Thank you Debi and Charly. We are a “Adorned from Above” friend too.