Come See this Fun Rental Kitchen Makeover with Floral Cabinets!
Check out this before and after rental kitchen makeover with floral cabinets using peel and stick wallpaper and other clever DIYs!
This is a sponsored post. All thoughts and opinions are my own. You can read my full disclosure here. Thanks for supporting brands I love!
This post contains affiliate links for your shopping convenience to brands I love. You still pay the same price but I may earn a small commission.
Hi, there friends! Eek! This week has been the most fun for me during the One Room Challenge. I finished installing the floral removable wallpaper on my cabinets and am just smitten with the way they look and can’t wait to give you all of the details.
A rental Kitchen Makeover Using Peel and Stick Wallpaper on the Cabinets
The One Room Challenge is a 6-week room makeover/renovation for a group of featured bloggers and 100s of guest participant bloggers like myself if you aren’t familiar with it. This is the first time I’ve participated and have really enjoyed the process and interaction with readers and other bloggers.

First, let me give you a little background. My family and I are living in a rental home in beautiful Okinawa, Japan while my husband is stationed here. We have views of the ocean and lots of natural light in our small house.
All of the surfaces including the floors are white, cream, or light mint. It really is a blank canvas to put our renter-friendly stamp on.
The kitchen has cabinets with a slick surface, maybe plastic?, which makes them perfect for a makeover. They are also creamy looking next to the white appliances and tiles.
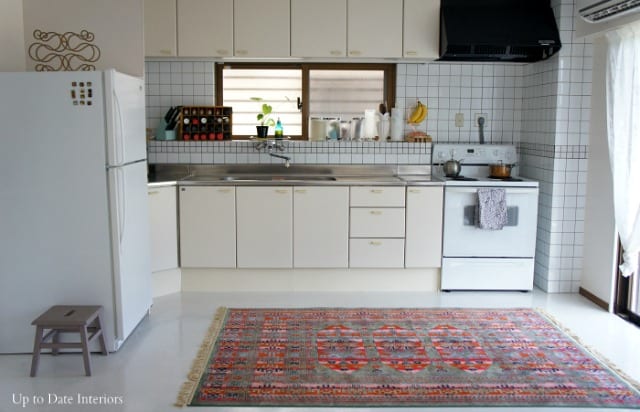
After I prepped for the rental kitchen makeover with inspiration, organization, and even updated the tiles, it was time to tackle the cabinets!
Update: Find all of the One Room Challenge stories below.
Week two: Cabinet Organization
Week four: DIY Swiss Cross Tiles
Week six: Rental Kitchen Reveal
I thought this part of the room makeover would take the most time but I completed this project in 2 hrs! I reached out to Walls Need Love and they sent me three 10 foot rolls of Clara wallpaper. I decided to hang it vertically so the pattern would line up across the cabinets from left to right.
It worked out perfectly. I used a yardstick and craft knife for nice, straight cuts. Make sure to measure twice and cute once if you are trying this!

Here’s how to install a renter firendly kitchen cabinet makeover using peel and stick wallpaper:
- Remove any hardware and make sure your caninets are clean.
- Think of your upper and lower cabinets as one unit (like a solid wall). If all of your upper cabinets are the same vertical size then you can start at the top of the first upper left cabinet and after your first cut, continue the paper on the lower cabinet. Then you would line up the pattern on the second upper cabinet and continue in the same fashion. If you’re first left upper is smaller one, make sure to leave extra paper at the top so when you get to your tallest upper cabinet size, the pattern matches up.
- Measure twice and cut once! Precut your wallpaper pieces using a straight edge and exacto knife or fresh razor blade so you don’t rip the paper. Leave just a little extra room so you can wrap the paper around the edges if you need to.
- Start applying the peel and stick wallpaper by peeling off the first part of the first cut and line up on the cabinet. Slowly smooth down with a flat tool or your hand and continue peeling off the back until the paper is fully on.
- Our kitchen cabinets were so smooth that I didn’t have any issues with air pockets or bubbles. But if you run into this problem you can adjust and retick the paper, use the smoothing tool, or poke a hole into a bubble with a straight pin and push down with the tip of your finger and it will lay flat!


The wallpaper was a dream to install. It was easy to reposition and didn’t leave any sticky residue like the last contact paper I used. Yes, this is the second time I’ve covered these cabinets.
Since I had previously tested this makeover with contact paper and successfully removed it without damaging the cabinets at all; I was confident in installing this lovely product!
Do read this story for more details on how to DIY a renter-friendly cabinet makeover and see how I also covered the toe kick and temporarily changed out the pulls with a dollar store option.
I’m super happy I made the decision to recover them again. It’s such a crazy design choice (which is why I LOVE it!) but a perfect short-term solution as a renter! I mean, who else has rose-patterned kitchen cabinets?

If want to try something similar but a smaller project, give a piece of furniture a makeover with peel and stick wallpaper!
A quick rundown of the ol’ to do list:
Spruce up seating with a pop of color
Remove old contact paper
Cover cabinet doors in a floral pattern – renter friendly
Update pulls to brass or gold
Hang new art
Add a new rug
Update tiles – renter friendly
Better organization of countertop space and cabinets
Maybe try something new with the window treatments?
A big thank you to these companies for sponsoring my project; Minted, Epson, and Walls Need Love.
Join me on Instagram for behind-the-scenes, DIYs, decorating tips, room tours, and home inspiration. I’ll see you over there!

- Sunshine on a Wall: Crafting a DIY Sunburst Mirror with Skewers

 Craft your own gold DIY sunburst mirror with our easy tutorial. A budget-friendly, step-by-step guide using items you probably already have. Are you searching for a budget-friendly way to elevate your home decor? Look no further! Discover how to create a stunning DIY sunburst mirror that adds style and flair to any room without breaking…
 - How to Make an Apartment Feel Like Home: 10 Temporary Decorating Ideas
 Discover “how to make your apartment feel like home” with our expert tips! Transform your space into a cozy sanctuary effortlessly. Hey apartment dweller! Ready to banish that “temporary” vibe? As a seasoned renter and designer, I’ve helped many renters turn their temporary space into a cozy haven with easy-to-follow decorating and design tips. Let’s…
 - Try This Easy DIY Vase Decorating with Faux Succulents
 Discover how to craft a beautiful DIY vase adorned with faux succulents. Enhance your home decor affordably with this project, bringing a modern touch to any room. Looking to add a touch of modern elegance to your home decor without breaking the bank? This budget-friendly DIY succulent vase project is just what you need! Let’s…
 - DIY Clipboard Art Display with Creative and Easy Decorating Ideas
 Transform your space with a stylish clipboard art display! Learn how to elevate ordinary clipboards into chic decor pieces with a DIY guide. Are you tired of the constant struggle to keep your child’s artwork organized and proudly displayed without cluttering up your walls? Or perhaps you’re looking for a chic and budget-friendly way to…
 - How to Create Family-Friendly Interior Design: 10 Practical Tips
 Discover practical tips and creative ideas for family-friendly interior design that combines safety with style. Are you a parent who has wondered how to have your “dream home” and not have nightmares about destruction or injuries? Fear not! Ever since our kids were babies, I have always been passionate about decorating our home. Through trial…
this is such a fun and unique update, kathy- love this idea!
Thanks Cassie! I giggle everytime I see my floral kitchen. 🙂
Such a great idea to cover the cabinets in pretty paper!
Thanks so much! Now they just need pulls. 🙂
Kathy! This is like crazy different…Love it!
It is! lol Thanks sweetie!
Kathy the wallpaper is just fantastic. I can’t wait for the reveal! I love the direction the room is going in. As a fellow ORC participant it’s been wonderful to gather some fantastic inspiration. I’d love for you to share your progress at Thoughts of Home on Thursday. Our readers would love to see it. The gathering is at http://www.decortoadore.net
Thanks so much Laura!!
This is so creative and unexpected- just love how it is coming together!!!!
Thanks so much Christine!
Oh. EM. GEE. This is so brilliant and it looks amazing!
lol Thanks Madeline! I can’t believe how easy it was.
That’s such a cool idea! Definitely interested in seeing the final reveal! Looks great so far 🙂
Lauren | Lovely Decor
xx
AW! Thanks Lauren! xoxo
Cutting the paper vertical… genius! It looks really good. and 2 hrs, wow! this might be something I want to do in my future.
I know! I can’t believe it only took 2 hrs. Walls Need Love was amazing to work with. Thanks!!
I used contact paper on the cabinets in my first apartment in college but the 1990’s Ivy wasn’t nearly as pretty as yours and that black hood is making more sense every week!
Lol, I’ve had some questionable contact paper in the past. My friends that come over keep asking if I’ve painted the hood! Thanks for the sweet comment.
What a great idea. The cabinets look awesome!
Thanks Celine! We love them. 🙂
What a fun idea to cover your cabinets! I love the floral wallpaper on them, such a great idea! Can’t wait for the reveal!
Thanks Tilisa! They are definitely a conversation starter now. 😉
What a good idea to hang the paper so that it lines up between the different doors – I really like how the bottom cabinets look!
Thanks Nicole! It was so easy to line up and apply. I’m thinking about my next wallpaper project!
This is unreal!! You have STUNNING design taste! I can’t wait to see this room revealed next week. The floral cabinets are perfect 🙂
Wow! Thanks Lindi. You totally made my day! xoxo
it looks great! What a fun update – I admire your creativity!
Thank you Jenn!
I love the progress, the room looks so stylish, the wall paper is to swoon over !Look forward in seeing your reveal in a few days
Maria
Thanks Maria!
Did you use normal wallpaper paste?
I used temporary removable wallpaper that already had adhesive on the paper. It’s similar to a decal. I could apply and reposition it easily. It took a little elbow grease and goo gone to get the cabinets clean after I removed the paper but it was easy. 🙂