
How to Make Plaster Flowers with Dollar Store Stems
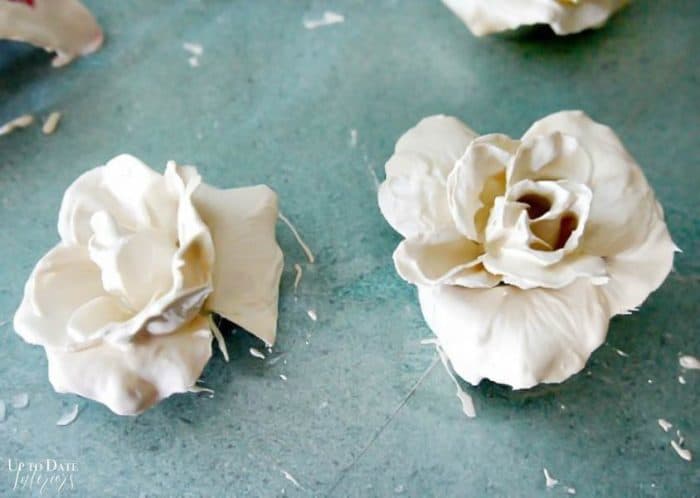
Plaster of Paris flowers with dollar store stems for an easy DIY on a dime! Read on to see how to make these beautiful dipped flowers.
Hey there!! I’m so glad you stopped by today. Have you ever seen a plaster dip flower? They are absolutely stunning and so versatile for home decor projects and great gifts ideas!
I’m sharing how to make these plaster of Paris dipped flowers with dollar store floral to keep the simple DIY on a budget.

DIY Plaster Flowers
If you are new here, howdy! I’m a retired military spouse who moved back to Texas after being gone for 19 years.
I perfected the art of rental decorating and overcoming challenges in small spaces for over fifteen years but now am tackling homeownership with a new set of challenges!
Our family of four lived in some of the most beautiful coastal towns in the US and Japan which have influenced my colorful and global style with DIYs and furnishings in our one-story 60’s ranch-style home in Fort Worth.

*This post contains affiliate links for your convenience.
What you need for plaster dipped flowers:
- Plaster of Paris (you can find this at your local hardware store or craft store)
- Flowers to dip Use faux stems that have stiffer petals and fuller heads as the weight of the plaster will not work well with flimsy ones. My favorite were white roses from the dollar tree. I only needed to dip them once and they have a beautiful shape.
- Wire cutters and hot glue (as needed).
- Plastic container, spoon and wax paper.
- Mask and gloves to be on the safe side. *Plaster of paris is calcium sulfate hemihydrate and when mixed with water can have an exothermic reaction. Please read your package carefully and take precautions.

Plaster of paris flower making:
- Step one: Prepare your workspace by laying out a couple of sheets of wax paper for drying. Remove the stems and leaves from your flowers. If the stem was holding the flower head together you may need a dot of hot glue to keep it together.
- Step two: Mix some cold water with your plaster powder using the recommended water/plaster ratio on the package. Stir until the lumps are out and it’s about yogurt consistency. Add a teaspoon or two more if it isn’t yogurt consistency.
- Step three: Dip your flower, twirling it around in the plaster to completely cover it. Shake off access plaster while you are holding it inside the container. Dip again if you need more coverage.
- Step four: Lay out the dipped flower to dry on wax paper. The plaster will take 10-15 minutes to completely harden so you have time to shape the petals if you like while it is drying. I’ve seen some beautiful larger flowers turned into votive candle holders. You may also want to separate petals on fuller flowers.
Q&A on how to make plaster flowers
I’ve gotten such a great response to this DIY and lots of good questions. Check out these additional tips and tricks on what you can do with plaster-dipped flowers and how to fix some common problems.
“Can I tint the plaster with food coloring?” It probably wouldn’t mix well. I would use a water based craft paint to tint the plaster but only if your desire is a pastel color. Otherwise, wait for the plaster to dry and then paint with your choice of acrylic colors.
“Can I plaster branches or bows?” You can dip just about anything (within reason) into plaster but keep in mind that smaller details will get lost with the plaster layers. It’s fun to try new things! I’ve dipped faux maple leaves and they turned out lovely.
“When you say remove stem and leaves, do you leave the plastic thingie attached to the flowers when you dip them? The part that holds it all together?” Yes. If the stem can be removed by leaving the receptacle intact then it’s ready to be dipped. Otherwise use a dot of hot glue in place of the plastic parts that keep the petals together.
“I tried this and my petals collapsed and stuck together. I would like to know how you shaped your roses?” First, what kind of flower are you using?
I think the easiest flower to use is a faux rose that is blush, white, or cream so the color doesn’t bleed through. After a little practice, I would try dipping poppies, daisies, or ranunculuses. Lilies, orchards, and other large flowers with fewer petals are the most difficult to keep in shape.
If your petals are sticking together try thinning the plaster. After one dip and a few minutes of drying dip a second time for full coverage. You can shape the petals with your gloved fingers on the wax paper as needed.

“I tried this and the plaster chipped off, what am I doing wrong?” Make sure to use the plaster quickly as it set pretty fast and also experiment with different consistencies. You can always do two thinner dips letting the flower dry in between.
“Hello, can you paint the flowers once dried? If so what type of paint would you suggest?” A water-based craft paint like acrylic would be perfect for a project like this. You can protect the paint with a coat of polyurethane once it dries.
“Can plaster of Paris get wet after it has dried? Is it waterproof for outdoor use?” The Plaster of Paris is porous so you would need a coat of resin or shellac to use it outside.

“I would love to do about a billion of these and make a focal point wall my question is what would I use to adhere them to said wall?” If you are attaching them individually, I would think a small finishing nail or a thumbtack would work right throw the middle of the flower.
Otherwise, maybe hot glue them to a surface first like a piece of MDF and then hang that.

DIY Plaster Dipped Dollar Store Flowers
Transform dollar store flowers into beautiful plaster flowers with just a few dollars and this easy DIY.
Materials
- Plaster of Paris
- Dollar store flowers
- Water
Tools
- Plastic container
- Spoon
- Wax paper
- Measuring cup
Instructions
- Remove the stems and leaves from your flowers and lay out sheets of wax paper for drying.
- Mix cold water with your plaster powder (use the recommended water/plaster ratio on the package). Stir until the lumps are out and it’s yogurt consistency.
- Dip your flower, twirl it around, and completely cover it. Shake off access plaster while you are holding it inside the container. Dip again if you need more coverage.
- Lay it out to dry on the wax paper. Spread or shape the petals if needed.
Notes
The plaster of paris dries quickly so you can use them almost immediately.
Recommended Products
As an Amazon Associate and member of other affiliate programs, I earn from qualifying purchases.


They will dry fairly quickly and then you can use them! Style them in a bowl, glue them to the backing of a frame dipped flower art, or display one or two on a stack of books. You could also cover a lamp base, napkin rings, or vase!

They really look so romantic and delicate but they hold up very well! I loved using them for Fall decor and you find more Fall decorating ideas on this page.

Don’t you love a good dollar store DIY? If you are looking for more ideas. Here are some of my favorite ideas.

I made these beautiful plaster flowers for a Fall DIY and think they would look great for seasonal or table decor.
Leave me a comment and let me know which one is your favorite or what you have been working on lately. I would love to hear from you!!
Join me on Instagram for behind-the-scenes, DIYs, decorating tips, room tours, and home inspiration. I’ll see you over there!

- Best Curtains for Green Walls (Designer Tips & Color Ideas)

 Discover the perfect curtains for your green walls! From warm earthy tones to cool blues, find the ideal match for a stylish interior. Hey there! Green is my favorite color,…
 - How to Decorate a Paper Lantern with Brilliant Floral Accents
 Learn how to decorate a paper lantern with flowers on a budget for your next celebration or to update your home decor! Hi friend! I’m excited to share a DIY…
 - DIY Plate Magnets: Personalize Your Fridge with Easy Homemade Decor
 Transform your fridge with DIY refrigerator magnets! Learn how to make your own magnets using dollar store plates and easy steps. Get creative now! Are you tired of the bland…
 - A Step-by-Step Guide for Creating An Aesthetic Bookshelf in Different Styles
 Embrace the bookshelf aesthetic! Discover creative tips for beautifully styled and curated shelves and easily transform your home. Having a beautifully curated bookshelf or bookcase is one of my favorite…
 - How to Choose the Perfect Curtain Size: Your Ultimate Guide + Free Printable Curtain Size Chart!
 Discover the secrets to perfectly sized curtains on a budget with a free curtain size chart and an in-depth guide for stylish window treatments. Have you ever found yourself standing…
oh how cool. These would make a lovely center piece for a wedding, reception or bridal shower.
I was thinking the same thing….=)
I love these. Can you tint the plaster mix with food color? Might be an interesting combo.
It may not mix well. I was use a tint powder or water base paint. It may be easier to just paint after the plaster dries with acrylic paint to achieve desired colors.
Can you dip tree branches too? Or what about beautiful bows?
I love the beach at any season. And I’m loving the plaster dipped flowers. I am so doing this. Thanks for sharing.
I love the beach at any season. And I’m loving the plaster dipped flowers. I am so doing this. Thanks for sharing.
Awesome. I know you will love making those flowers. So easy and so much fun!
Love’m. Pinning.
Sorry I missed this comment Vidya! THanks for pinning!!
I have a dumb question. when you say remove stem and leaves, do you leave the plastic thingie attached to the flowers when you dip them? the part that holds it all together? Thanks.
Yes, leave the middle part there, it makes a great spot to hold the flower and it keeps the flower together! Just pull the stem out from it. GOOD question! 😉
I tried this and my petals collapsed and stuck together. I would like to know how you shaped your roses. Also, have you attached any to a piece of art?
Ginger, the flowers I used were from the dollar tree and not very full, they are also on the smaller side. That is probably why the petals didn’t stick together or collapse. You could probably thin the plaster a little with water and make sure to shake off the excess. I did hot glue one onto a “knock off anthro” vase. I think they would look lovely in a shadow box as a cluster. You can also paint them. Let me know if I can be of further assistance. 🙂
I’m ready to try this! Thanks for the step-by-step photos. That makes it look really simple.
Wonderful! Have fun. 🙂
Can this be done with tree branches or bows?
Absolutely!! That would be so pretty!
I have this idea of tipping roses up to that stubby point that connects to stem. Then when dry cutting that off and inserting a Christmas light thru until I complete the strand of lights. Would that work. Don’t want to cause a fire.
What a creative idea! That would be beautiful.
I’ve used white flowers and got the perfect results,but when I try with a coloured flower the plaster doesn’t cover the flower very well.what am I doing wrong?
Kathy loved it ! Pinning it !😊 Want to see more from you .. what to do further you need to guide !👌
Thank you!
I tried this and the plaster chipped off , what am I doing wrong ??
Hmm, I didn’t have any problems with chipping. Maybe you used too much water? Or didn’t use the mix fast enough? Plaster sets so quickly. I would experiment with different consistencies and if that doesn’t work, maybe try a different brand of plaster. Sorry you are having a hard time with it! Good luck. 🙂
Hello, can you paint the flowers once dried? If so what type of paint would you suggest?
Yes you can! I would personally go with pastel warm colors like blush pink, light coral, and yellow. But you can use your favorite flowers for inspiration!!
I tried this but it didn’t turn out well, everything stuck together in a gloppy mess. Will try again.
Sorry to heart that! You might try a different silk flower with thicker petals and also smaller ones with many petals seem to work well! Also the plaster might have been too runny… good luck!
I am excitied
Wonderful!
Kathy, I’m curious if the plaster of paris can get a little wet after hardening? (or even an outdoor application?) Also any ideas on how to add a “glazed” finish to it?
If you want to try to waterproof it for outside, you should be probably use a coat of resin or shellac. For a glazed finish, I would spray it with polyurethane. 🙂
Hi Kathy I would love to do about a billion of these and make a focal point wall my question is what would I use to adhere them to said wall?
That sounds amazing. If you are attaching them individually, I would think a small finishing nail or a thumb tack would work right throw the middle of the flower. Otherwise, maybe hot glue them to a surface first like a piece of mdf and then hang that.
I tried this also. The first time, the plaster was too liquid-y so the petals were very fragile and broke off when placing them. Second time I made the mixture a little thicker, dipped in the flower and placed on wax paper. Turned out great. Since I was almost finished with the mix, I put some food dye (lightly) in it and dipped some more. So I have flowers with a trace of light blue and they’re beautiful ! Thanks
What a great idea with the food dye! Thanks for stopping by.
This is one of the most effective and yet simple diy projects I have ever seen, I’m going to try it as soon as I can assemble the ingredients, thank you for taking the time to share.
Thank you! It’s very easy to do and fun!
i just did this,,,they turned out gt,,I did use glue in water then added plaster,,,,,but did fine out wear gloves,,,this stuff burns the skin,,,,,,
Oh interesting! Did the glue make a difference? I’ve only used plaster of paris. 🙂 Glad they turned out great!
Are the bottoms of the flowers after you cut the stems off flat enough to sit up to dry? I don’t want a flat side on them.
Some were flat and some dried on their side. You could leave the stems attached and hang them with a clip to dry!
To those asking about tinting plaster of Paris with food color:
I’ve tried this and, based on my results, don’t recommend it. The colors –used several — looked fine at first. However, I observed obvious fading within a day. All color faded within a few days. This occurred with all colors and with both liquid and paste food colors. I didn’t seal the items I had made. That might help if you don’t mind a shinier surface. My hypothesis is based on observation: the colored plaster of Paris seemed to fade as though color was leached into humid air. I live in a humid climate and objects left in the kitchen to dry faded faster than those dried in a less humid room. Just one woman’s thoughts and experiences.
Thanks so much for sharing that Gail! I appreciate you letting my readers know. I wonder if tinting with acrylic paint would be better? Or just painting once dry…
just to comment our local craft store family owned used to have molds to pour plaster of Paris into to make all kinds of chess sets and figurines we would spray paint the articles first with cheap 98 cents spray paint and then paint with acrylic craft paint and then paint with clear plastic spray paint other than the fact that these were fragile due to what they were made out of we had beautiful results just a word of recommendation
That sounds so fun! Thanks for sharing.
This tutorial on creating plaster flowers from dollar store finds is truly inspiring! The step-by-step instructions make it easy to elevate home decor on a budget. The finished flowers look so elegant, adding a perfect touch of nature to any room.
Thank you!