DIY an Armchair Slipcover for under $20 with this Easy Tutorial
Transform your furniture on a budget! This guide shows how to DIY an armchair slipcover for less than $20 using basic sewing techniques. Cut, pin, trim, and sew – that’s it!

Making your living space reflect your style doesn’t have to be expensive or require extensive sewing experience. With some creativity and a simple drop cloth, you can create a custom DIY slipcover for your armchair.
It’s a perfect way to transform an out-of-place piece of furniture into something that not only fits your aesthetic but also showcases your handiwork.
In this guide, I’ve simplified every step to ensure you can easily follow along and craft a slipcover, even if you’re new to sewing.
How To Craft An Easy DIY Armchair Slipcover?
Meet the chair…

Our living room is full of sunlight and light colors, but we have a black leather club chair that does not fit in. I finally took out my sewing machine and a $20 drop cloth (I had a couple on hand ;)) and decided to tackle a slipcover.
Outside of sewing curtains and pillow covers, I don’t have a lot of experience with the sewing machine.
So, here is the step-by-step Cheater’s Guide to Making a Chair Slipcover:
You’ll need the following materials:
- Drop cloth or fabric of choice
- Sewing machine
- Thread to match your fabric
- Scissors
- Straight pins
- Measuring tape
- Chalk or fabric marker
- Iron and ironing board
- Hook and loop Velcro
- Seam ripper (just in case)
Note: To make this tailored armchair cover project easy, I didn’t use cording or zippers.
Now, let’s get started with the Simple armchair cover tutorial:
- Choose Your Fabric Wisely
When considering how to make slipcovers for armchairs, the choice of fabric is crucial. Denim, twill, canvas, or home decor fabric are all excellent choices due to their durability and ease of handling.
Now, You may ask!
What is the best fabric for armchair slipcovers, and why?
The ideal fabric for sofa slipcovers depends on your needs. Polyester-spandex blends offer a balance of aesthetics, durability, and value, making them a top choice for ready-made slipcovers.
For custom options, polyester provides maximum durability, while cotton offers comfort. A blend of the two can offer a good compromise, and pure polyester is favored for its performance, resistance to wrinkles, and affordability.
Before you begin, pre-wash the fabric to prevent shrinkage later on.
Iron out all the wrinkles to ensure a clean, precise fitting during the marking and cutting process of your slipcover.
- Measuring For The Slipcover
But let’s not get ahead of ourselves. You might be curious about measuring the fabric. Unlike a reupholstery project where the old fabric can serve as a pattern, creating a slipcover necessitates precise measurements of your armchair.
There are two methods to gauge the size of your fabric pieces:
- Measure each area with a tape measure for a rough size estimate, allowing extra material for adjustments.
- Use your chair as a model for cutting out pieces. Get the size of your armchair from one end to the other, over the arms and across the seat. Measure the width from the front, over the top, and to the back. Stick close to the sofa’s shape because every bit matters.
These measurements will help in making armchair slipcovers that fit like a glove.
Sewing Tips For An Affordable Armchair Makeover:
Lay your fabric on the wrong side facing out. This inside-out trick lets you tweak the fit and trim excess fabric before you commit to sewing.
Make your cuts at least a couple of inches larger for seam allowance. The extra fabric around the edges will help with extra adjustments.
Go slow, and keep your seam ripper handy. 😉

Let’s not forget the Cheater’s Tips:
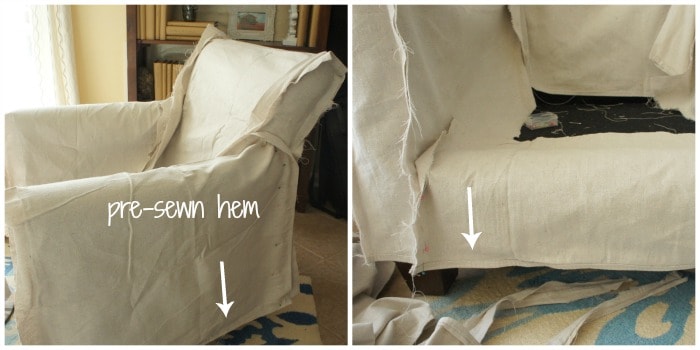
The pre-hemmed edges of a drop cloth can serve as the finished bottom edges of your slipcover, reducing sewing work.
Utilize the existing seams of the chair as a guide to where the fabric should lay, cutting and shaping the drop cloth accordingly.
You’ll need separate pieces for the inside back, sides, seat, inner arms, front, and lower back. So, work your fabric around the armchair’s curves and pin it. Cut pieces for each section and pin them together. Baste them, which is like a temporary stitch to hold everything together.
- Cutting and Sewing:
Now, begin by draping the cloth over the back of the furniture and making your initial cuts. Go with simpler shapes first, like the seat’s flat underside.
If your chair is wider at the top, create two overlapping flaps in the back (you can add ties to them if you like) for easy removal and fitting.

Pin the arm sections following the chair’s contours (existing hems).
It’s time for some bonding with your sewing machine! Sew this section and check the fit (make adjustments, if needed) before moving on.
Drape fabric on both sides of the chair, cut to fit, and keep pinning!
The front “skirt” can be added last. I sewed it at the end and left the seat open because I have a removable cushion.
Note: For symmetrical parts, fold the cut fabric to double-check its mirror image. As you slice out pieces with multiple sides, use the cut pieces as templates to get the shape just right for their counterparts.
When you hit complex spots (like pleats), allow a little extra fabric. Pin, chalk, then trim.
- Cushion Calculations:
Make chair slipcover cushion covers by measuring the length and double it, then get the thickness and add a couple of inches for a perfect fit.
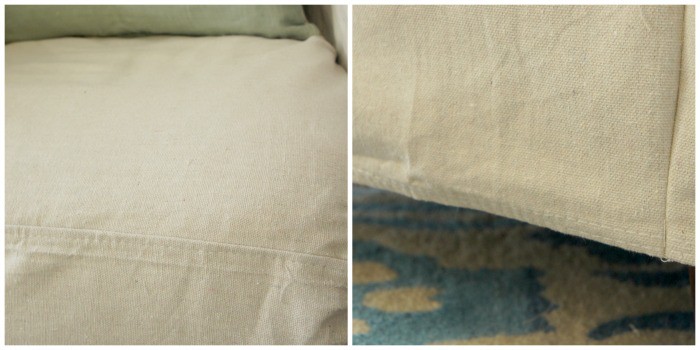
Sew your cushion cover all around, but leave one side partly open to slip the cushion in. I cheated here again by using the seam that ran down the middle of the drop cloth for the front top hem. (So it’s perfectly straight.)

Finally, turn the covers right side out, pop the cushion in, and hand-sew the opening shut with an invisible stitch.
- Quick Fixes and Closure Ideas:
Decide on a closure method for easy removal. Using Velcro as a closure makes your slipcover removable and easy to wash, which is a clever tip for a quick and easy chair slipcover.
Pro Tip: If you want to know how to put a slipcover on your sofa/chair effectively. Here’s the drill:
Cut fabric strips for the Velcro tabs that’ll attach beneath the chair. This creates a clean finish without the need for a skirt.
Ta-da Moment!
You’ve just tailored a new outfit for your chair. The result? A piece of furniture that screams YOU.
Here is how it turned out! You can see the existing hems look great. It’s custom, it’s bold, and it’s 100% vibes with my space.
One more pic!

Don’t fret about imperfections; this DIY slipcover for your armchair has character and custom charm a store-bought one could never match. It’s not just a cover; it’s a statement that you can do anything with a little ingenuity.
With this guide, you’re not limited to just one chair style. The principles can be applied to various furniture pieces, so let your creativity run wild.
Make sure to snap some before-and-after photos to show off your homemade armchair cover ideas.
And hey, don’t forget to swing by tomorrow for Up to Date Interiors’ Spring Tour for more inspiration!
Homemade Armchair Slipcover Ideas – FAQs:
Is there a way to repair a tear in my DIY slipcover for the armchair?
For a tear, you can sew a sturdy fabric patch behind the damaged area and then stitch it closed using a thread that matches the color of your fabric. For small holes, trim the frayed edges before sewing a discreet patch in place.
How much fabric do I need to make a sofa slipcover?
The amount of fabric necessary will depend on your sofa’s dimensions and the fabric’s width. Solid colors work best for seamless designs, but if you want patterns, remember to allocate extra fabric for alignment.
The fabric typically comes in standard widths and is sold by the yard. Here’s a basic guideline:
- For a two-seater sofa, estimate about 14 yards (12.8 m)
- For a three-seater sofa, estimate about 16 yards (14.6 m)
- For a larger sofa with six cushions, estimate about 20 yards (18.3 m)
- For a small loveseat, estimate about 11 yards (10 m)
- For a medium four-cushion loveseat, estimate about 15 yards (13.7 m)
What is the simple way to work out how much fabric you need for an armchair cushion?
To calculate fabric, measure the length and width of a cushion from all sides and other fabric-covered areas, adding an inch for seams. After getting the measurements, convert them into yards by dividing by 36, since upholstery fabric typically comes in 54-inch widths.
Can I revive my armchair on a budget?
Reviving a tired armchair doesn’t always require a full makeover. Here are some top considerations:
- Begin with a deep clean—vacuuming might even uncover a little surprise in the crevices!
- Remove pet hair with a slightly wet rubber glove, sweeping in the direction of the fabric grain, or use a lint roller for a quick touch-up.
- Next, clean the frame and cushion covers according to their care instructions, using suitable cleaners.
- For sagging cushions, slide a piece of fireproof foam inside them or replace the foam altogether.
- Deal with leather scratches using shoe polish or a felt-tip pen matched to the color of your armchair, but always test in a hidden spot first.
What is the difference between slipcovers and upholstery?
The difference between a sofa cover (or slipcover) and upholstery is that a slipcover is a removable fabric protector that fits over the original upholstery of a sofa, whereas upholstery is the material—including fabric, padding, webbing, and springs—that is permanently attached to the frame of the sofa itself.
What can I use instead of a slipcover for my armchair?
You can use a variety of household textiles when it comes to DIY slipcover ideas, such as patterned blankets, bright sheets, wool throws, vintage quilts, tablecloths, and even breezy linen sheets, to creatively cover and protect your armchair.

You might also enjoy these other inexpensive furniture makeover ideas!
- DIY an Armchair Slipcover for under $20 with this Easy Tutorial

 Transform your furniture on a budget! This guide shows how to DIY an armchair slipcover for less than $20 using basic sewing techniques. Cut, pin, trim, and sew – that’s it! Making your living space reflect your style doesn’t have to be expensive or require extensive sewing experience. With some creativity and a simple drop…
 - Revamp Your Space: Easy Lamp Makeover Ideas to Update Your Decor
 Bring new life into your decor with a DIY lamp makeover using paint and ribbon. Transform a mismatched lamp into an updated stylish one! Hey there, dear reader! Have you ever felt limited by the colors in your home decor, like a beautiful lamp that just doesn’t quite fit with your current style? You’re not…
 - How to Revamp Old Furniture with Decoupage: A Step-by-Step Guide
 Find a step by step guide on decoupaging furniture, perfect for beginners, and give your old piece of furniture new life! Welcome! Today we are exploring creative ways to revamp your furniture with the art of decoupage. If you have a piece of furniture that needs a little love but don’t want to paint it,…
 - Make a Beautiful DIY Cane Cabinet in 2 Easy Steps
 Transform a storage piece into a beautiful cane cabinet with this easy DIY using thrifted or IKEA furniture and web caning. Sometimes it is fun to go with a trend especially if you’re smitten with the idea. When you dream of your ideal decor and interior space, can you see cane furniture fitting in? I…
 - How to Paint a Mirror Frame Gold Easily In Two Steps
 Transform an outdated mirror or picture frame with gold paint without having to remove the glass by using this simple mirror painting technique! Do you ever have an unfinished project due to a lack of experience or uncertainty about how to go about it? Or maybe you think it might take too long? You probably…

Decorating in Maximalist Style
Learn how to decorate with a maximalist vibe without feeling cluttered. It’s not your grandmother’s floral but has lots of fresh colors, modern surface coverings, layers, and use of traditional design.


What a quick, inexpensive way to cover a chair without lots of work or skill.
Thanks Stephanie! Absolutely right. 😉
I’m so very intimidated by slip covering but you made it look easy. Cute blog!
Thanks! I was a little scared too but just went for it. 🙂 So glad you found my blog, off to visit yours!
Thanks so much for sharing this! Great tutorial for sewing dummies like me….and it turned out fab!
Thanks Jenna! I was surprised that it came out as well as it did. It sure makes a huge difference for the room. 🙂
This looks great! Good job! Did you have to change the tension or use heavy duty thread? I’m afraid to put such heavy fabric through my machine. I have an old machine.
Thanks Pam! I just used my regular thread. The drop cloth surprisingly wasn’t very thick and I didn’t have any issues at all with my sewing machine and it’s almost 20 yrs old. 😉