How to Make a Perfect Pinecone Wreath with Easy Tips
Follow these easy steps to make a pinecone wreath with a foam wreath form. It’s the perfect Fall or holiday door wreath on a budget!
Hi, y’all. Hope you had a wonderful weekend! It’s the perfect time of year for collecting pinecones and creating holiday crafts. Making wreaths is one of my favorite DIY projects I do seasonally for this blog.
I love the texture and shapes of pinecones so I’m sharing tips for how to make a pinecone wreath with a foam base. It really is a lovely seasonal decor piece for the home and can stay out for Christmas and January!
How to Make a Beautiful Pine Cone Wreath for Beginners

If you are new here, howdy! I’m a retired military spouse who moved back to Texas after being gone for 19 years.
I perfected the art of rental decorating and overcoming challenges in small spaces for over fifteen years but now am tackling homeownership with a new set of challenges!
Our family of four lived in some of the most beautiful coastal towns in the US and Japan which have influenced my colorful and global style with DIYs and furnishings in our one-story 60’s ranch-style home in Fort Worth.
Materials for a DIY Pinecone Wreath
Here are the pinecone wreath making supplies you’ll need to make this beautiful rustic wreath.
This post contains affiliate links for your shopping convenience to brands I love. You still pay the same price but I may earn a small commission.
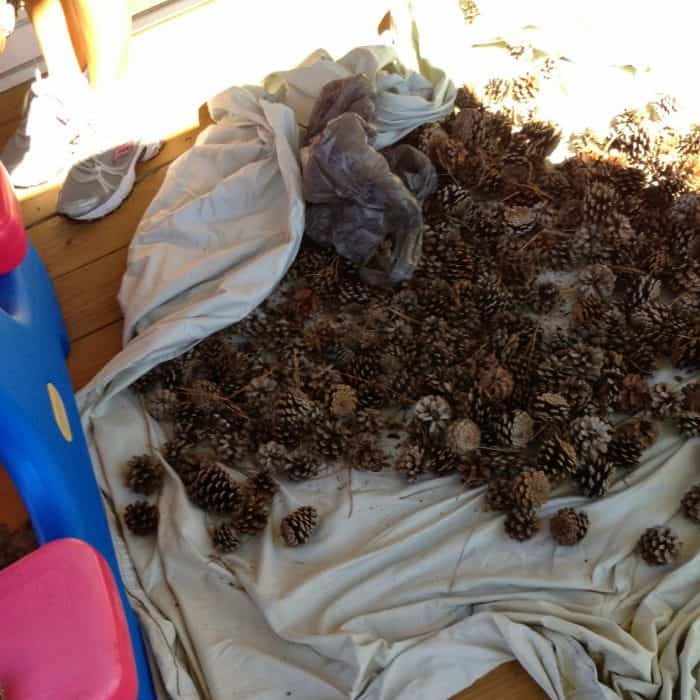
- Lots of pinecones (Scroll down to find out how to clean pine cones for decoration!)
- Jewelry wire (optional) We poked it through the styrofoam from the backside of the form, looped it back through, and twisted the ends together, leaving a little slack at the top for the “hanger”.
Steps for Making a Pine Cone Wreath
This DIY gives you the perfect excuse to take long autumn walks and collect cones or maybe they are already in your yard! Make sure to pick up all shapes and sizes for a nice full wreath of pine cones.
Here are pinecone wreath decorating tips that will you help whether you are a beginner or an avid crafter.
- (optional) Prepare your foam base by painting it with a light coat of gold or brown spray paint. Don’t get too close to the styrofoam as the paint can melt it. Taking this step will eliminate the need to fill exposed holes in the foam wreath.
- Using a grapevine wreath form or wire wreath form is another option but makes it trickier to get a full and even wreath shape. Skip this step if you plan to paint your pinecones after.
- Start on the inside of your wreath with smaller pinecones and hot glue them into place. If you pick the little knob off the bottom of the pinecone first it will lay flat and be easier to glue.
- After applying the glue make sure to press the pinecone into the wreath form for a few seconds to ensure it will stick!
- One option for your pinecone pattern is to continue gluing pinecone rings using larger ones as you move toward the middle of the wreath form.
- If you prefer a more organic shape, glue pinecones on in a natural way with different shapes and sizes. Just make sure to spread the varying colors and sizes evenly. The texture will be AMAZING! You can be creative with this tip to create unique pinecone wreath designs.


Pine Cone Wreath Tutorial
How to clean pine cones, attach them to a wreath, paint, and display a beautiful pinecone wreath.
Materials
- Collected or store bought pinecones
- A foam wreath form (other wreath forms will work too!)
- White vinager for cleaning
- Glue sticks for glue gun
- Spray paint is optional
- Wire and ribbon for hanging
Tools
- Hot glue gun
- Baking sheet
Instructions
- Prepare your pinecones by soaking them in a one-part white distilled vinegar to 2 parts water solution.
- Spread pinecones in a single layer on a baking sheet and place in the oven at 200 or 225 degrees for a few hours.
- Hot glue pinecones onto a styrofoam wreath form either neatly in rows from the inside to the outside or place large pinecones evenly around and fill with holes with smaller pieces. Pick off knobs from the bottom of the cones to lay them flat.
- Optional: Lightly coat the wreath with metallic spray paint. A little dusting will go a long way.
- Thread wire through the back of the wreath to hang or loop the ribbon around the middle and top to hang.
How to Make a Painted Pinecone Wreath
Painted pine cone wreaths: If you find that some of your green or white wreath foam is showing through you can fill in the gaps with pinecone petals or cover the entire wreath with a mist of gold spray paint.
It will give it a nice shimmer perfect for the holidays.

Hang your wreath onto a nail or wrap it with ribbon and hang it.

Later I repurposed some pinecones on a winter wreath that was made with a grapevine wreath form. I love the mix of textures and colors! Click on this story for the full tutorial.

Q&A for DIY Pinecone Wreaths
I’ve received a few questions on this post asking for tips for collecting and cleaning pinecones and other questions. I wanted to provide answers in case you have any of the same questions.
- “I’ve read before that you need to bake your pinecones to kill any insects in them. Did you do that with yours?” That’s a great tip! Our pinecones sat in the sun for a few days. My friend’s wreath is only for the outdoors and I spray-painted my wreath, hopefully, that killed any little critters. But if you are gathering pinecones from outside it is a good idea to bake them in the oven at 200 degrees for 20 minutes.
- “Are your wreaths flat on the back or did you completely cover the styrofoam?” I used a wreath form with a flat back so it lays nicely against a wall or door.
- “Did you start at the middle or back of the wreath to glue pinecones?” I started on the outside but have made other wreaths starting from the middle. Either way works!
Additional related questions on pine cone wreaths!
How do you keep pine cones on a wreath?
Attach pine cones to a foam or grapevine wreath base with hot glue.
Do you need to bake pine cones for crafting?
It’s a good idea to put your pine cones in a single layer on a baking sheet and bake at 200 degrees for 2-3 hours to kill any bugs or mildew.
How do you clean and prepare pine cones for crafts?
You might be wondering how to clean pine cones for crafts especially if you picked them up outside. Soak pinecones in a water and vinegar solution, mixing 2 parts warm water with 1 part white vinegar, and then bake in the oven for a few hours.
How to remove sap from pinecones
Follow the steps above for pine cone cleaning with a water and vinegar solution and then bake at 200 or 225 degrees for a few hours to remove sap from pinecones.
Making pinecone wreaths takes some patience but it’s a fun DIY and it looks amazing! Have you tried making one? Do you have any other favorite pine cone crafts or ideas?
I love the look of bleached pinecones and painted pinecones for wreaths and I’ve also made a painted pinecone door swag that turned out so pretty!
I hope you enjoyed learning about how to make a pinecone wreath. Check out 50+ decorating ideas and DIYs for Fall, Thanksgiving, and Halloween plus free printables and my friend’s beautiful 30+ printable Thanksgiving cards.
Thanks for stopping by and happy Fall!

- Best Curtains for Green Walls (Designer Tips & Color Ideas)

 Discover the perfect curtains for your green walls! From warm earthy tones to cool blues, find the ideal match for a stylish interior. Hey there! Green is my favorite color, and I’ve been decorating with it for years. It is one of the easiest colors to design a room with, and the perfect blank canvas…
 - How to Decorate a Paper Lantern with Brilliant Floral Accents
 Learn how to decorate a paper lantern with flowers on a budget for your next celebration or to update your home decor! Hi friend! I’m excited to share a DIY gem with you today, a beautiful floral paper lantern. And guess what? You can easily gather all your supplies at a local dollar store! Just…
 - DIY Plate Magnets: Personalize Your Fridge with Easy Homemade Decor
 Transform your fridge with DIY refrigerator magnets! Learn how to make your own magnets using dollar store plates and easy steps. Get creative now! Are you tired of the bland look of your refrigerator? Want to jazz it up with some magnetic decorations for refrigerators that reflect your unique style? Look no further! In this…
 - A Step-by-Step Guide for Creating An Aesthetic Bookshelf in Different Styles
 Embrace the bookshelf aesthetic! Discover creative tips for beautifully styled and curated shelves and easily transform your home. Having a beautifully curated bookshelf or bookcase is one of my favorite ways to showcase personal style and interests while also creating an inviting atmosphere in the home. But I know having an empty bookshelf or bookcase…
 - How to Choose the Perfect Curtain Size: Your Ultimate Guide + Free Printable Curtain Size Chart!
 Discover the secrets to perfectly sized curtains on a budget with a free curtain size chart and an in-depth guide for stylish window treatments. Have you ever found yourself standing in front of a window, unsure of what size curtains to choose? Maybe you’ve experienced the frustration of curtains that are too short, too long,…
Those wreaths are really pretty! What a lovely idea!
Hi! Stopping by from Mom Bloggers Club. Great blog!
Have a nice day!
Happy you found me Veronica. Thanks for the sweet comment.
I love your wreaths! So pretty!
Thanks Shirley! My friend and I are thinking about making pinecone trees next for Christmas!
My sister-in-law used to make pine cone wreaths years ago and a few days ago I was wishing I knew how to make one. Well, now I do! Thanks so much for sharing your beautiful wreaths. I will be making one soon and hope it’s OK to link back to your blog as my inspiration. I always like to give credit where credit is due. Thanks so much for linking up at Throwback Thursday!
Thanks Alli, please link back, that would be great! I’m glad my tips were helpful.
Thank you for joining the Throwback Thursday link party. You wreath is stunning! ~Jeanette
Thank you Jeanette!
I’ve read before that you need to bake your pinecones to kill any insects in them. Did you do that with yours? Beautiful wreaths!
That’s a great tip! Our pinecones sat in the sun for a few days. My friend’s wreath is only for outdoors and I spray painted my wreath, hopefully that killed any little critters. =) (We did talk about the “bug” possibility) I will definitely pay more attention for any indoor wreaths made with outside materials in the future. Thanks for the comment!
Love these! I have tons of pinecones in my yard that would be perfect for this.
Thank you Michelle! They are fun to make. =)
I have pine cones and am all ready for this project! Thanks for the tips!
The pinecone wreaths are beeeutiful!! I can’t wait to make one hopefully mine will look as fabulous as yours thanks for the tips 🙂
Thank you for the sweet comment Jessica. Good luck with yours!
How do I print the instructions how to make the wreath. I was able to print the picture of the wreath but not the rest.
I don’t have the pages set up to be printable. Did you try going under file and print your current webpage?
What size pinecones did you use? I really LOVE your look with the smaller pinecones! We’ve been wanting to make one and this helps so much!! 🙂
Hi Cassie, We used all sizes of pinecones. I put the small ones on the edges and only used a light coat of spray paint. You have to be careful with spray paint and styrofoam. If you hold it about a foot away, it does great. So happy that you enjoyed this post!
What size pine cones did you use? I really LOVE the look with the smaller pine cones. Did you spray a thick layer of gold paint on it? We’ve been wanting to make one for awhile and this helps so much! Thank you! 🙂
Hi Cassie, We used all sizes of pinecones. I put the small ones on the edges and only used a light coat of spray paint. You have to be careful with spray paint and styrofoam. If you hold it about a foot away, it does great. So happy that you enjoyed this post!
I love both versions of the wreath. And now I want to make one for Christmas!!!
Thanks for the sweet comment! They are beautiful for Fall and Winter. I might use my gold one this Christmas. 🙂
love the wreaths, I’m in the process of beginning one (just finished baking the cones!) but here is my question…. Are your wreaths flat on the back or did you completely cover the styrofoam?
I completely covered the styrofoam because my door had a window pane that shows the back. 😉 It would be easier to just do the front and sides if the back won’t show.
I love your wreath and was wondering did you start in the middle and work your way to the outside? I have a big bag of pinecones and they are big cones.
Thanks Lina! Actually, I started on the outside and worked my way in but starting on the inside could work! Have fun. It takes a little time. 😉
The wreath looks very nice. I love the Thanksgiving place setting with the floral china. ❤️
Thank you!
What size Styrofoam wreath did you use?
A 24 inch for the gold one! But my friend used an 18 inch with the more organic/natural-looking wreath. If I made another one I would use an 18 inch and fewer pinecones. 🙂
I’m just curious, did you find the wreath too heavy to hang? I made a pinecone wreath last year based upon the Serena and Lily one I saw and once completed it was too heavy for my door. I’m following your instructions this year as I try again. I will definitely be using a smaller wreath form.
How did you hang it on the door? A wreath hanger or a heavy duty peel and stick hook should do the trick! Good luck.