How to Make a Beautiful DIY Moss Art with Free Printables
Update your walls with this easy DIY Moss Art using free printables with floral patterns and faux moss for beautiful Spring decor.
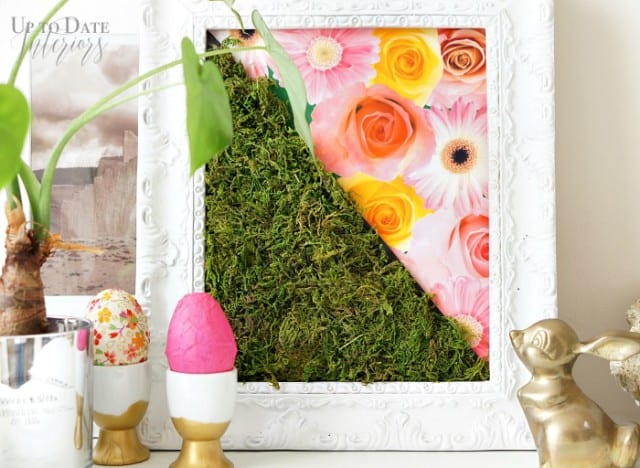
Spring is finally here and I’m thrilled to share this bright and cheery DIY Spring Moss Art with you today.
I know living moss walls and decor are all the rage and I even made a faux living art with succulents and air plants for the look without the price tag. But I decided to think more outside the box for this DIY art with supplies I already had.
(I mean how many of us have a picture frame without the glass because it broke, or floral craft supplies waiting to be used?)
So whip up this Spring craft in no time with an empty frame, preserved moss, and a free printable.
DIY Floral and Moss Art

Here’s what you need for this moss wall art DIY:
- An empty 8×10 picture frame. If you have one missing glass, that’s perfect!!
- Black cardstock or cardboard
- Preserved moss or dried moss for crafts from your local craft or dollar store. It will come loose or in a sheet. Either is fine for this project.
- Craft glue
- Paintbrush
- Ruler
- Scissors
- Your choice of a floral print (see below!)

Make a DIY Moss Art with Floral Print:
- Use the glass or back of the frame as a template or measure 8 by 10 inches with a ruler on a piece of black cardstock. Cut to size.
- Place your ruler on the 8×10 piece diagonally, trace it, and cut it in half.
- Use craft or Elmer’s glue to secure the faux moss in place. Squeeze some out and spread out evenly with a brush.
- Press the moss firmly in place. You may need to add a little more glue in some spots. I was surprised to see how well it holds together! Trim edges where moss overhands to get a neat “moss” triangle.
- Print out one of the printables below. Photopaper or cardstock works best and make sure to select 8×10 for the picture size or cut the printable to size after printing.
- Glue the moss triangle to the blank part. Let dry.
- Frame and enjoy!
(Click on the link, download, and print. For personal use only, pretty please!!)

Watercolor Floral 8×10 | Nature Floral Dark 8×10 | Roses and Daisies 8×10
It was fun to try different floral patterns with the moss. If you wanted something even more modern, try black and white stripes. My favorites are roses and daisies. The colors were just right to brighten my day and looked perfect with my DIY washi easter eggs.


I adore projects like this that only require a few simple supplies and decorating with natural elements. Check out DIY moss eggs, mini wreaths, and a moss and cherry blossom wreath using preserved moss for more ideas!
You may also like this large DIY moss art from Not Just a Housewife and a beautiful moss heart hanging art from Cottage on Bunker Hill.
You can find all the best decorating ideas and DIYs for Spring and Easter on this page! It also includes seasonal printables, checklists, and worksheets for Spring decluttering and organizing.

- Here’s How to Make Gold-leaf Watercolor Easter Eggs Easily

 Create beautiful seasonal decor with gold-leaf watercolor Easter eggs. Follow easy step-by-step instructions for different techniques. I love creating unique seasonal decor and gold-leaf and watercolor eggs were on the…
 - Cheerful Blooms: A Colorful Floral Spring Home Tour with Free Printable
 Join our colorful floral Spring home tour. Find creative decor ideas that bring cheerful floral accents and vibrant colors to every room. Warm greetings, dear friend and fellow decor enthusiast….
 - Crafting Feathered Friends: A Step-by-Step Guide to DIY Paper Mache Birds
 Learn how to make paper mache birds with supplies you already have using this easy DIY and step by step instructions for handmade modern decor.“ Birds of a feather stick…
 - Simple Remote Control Storage Ideas that are Actually Beautiful
 Chic and practical solutions for hiding remote controls on your coffee table and where to find them. Plus hand-picked store options. Hey there, fellow decorator! If you are anything like…
 - Learn How to Make Beautiful Washi Paper Eggs with Decoupage
 Make these gorgeous DIY decoupage easter eggs with plastic eggs from the dollar store and washi or origami paper in a few simple steps. Spring is in the air and…