How To Make DIY Velvet Pumpkins – An Easy Tutorial!
Make cozy, fancy velvet pumpkins at home with my simple step-by-step guide! Perfect for easy, fun fall decorating that adds a warm and luxurious touch to any room.
Y’all! I have joined the velvet pumpkin craze! Have you ever scrolled through Instagram or Pinterest and stumbled across something that made your heart race? That’s exactly what happened to me when I first laid eyes on DIY VELVET PUMPKINS.
These decadent, soft-to-touch, intensely hued DIY fall pumpkins were impossible to ignore!! Especially when combined with real pumpkin stems.

However, the DIY enthusiast in me was not just content with admiring them; I wanted to make this velvet pumpkin tutorial!
Have you made or purchased any yet? If you don’t want the expensive price tag, scroll down to see how to make handmade velvet pumpkin on a dime. It’s easy peasy!
The prices for pumpkins can get pretty expensive, so I’m glad I finally ordered some velvet fabric to create some. It was a pleasantly simple and quick process once I found/purchased all of my supplies. And If you can cut a circle and thread a needle, you are golden!
So, if you’re anything like me and are itching to make these glamorous fall decorations for your own home, keep reading.

DIY Velvet Pumpkins Tutorial In Just A Few Easy Steps!
This post contains affiliate links for your shopping convenience to brands I love. You still pay the same price but I may earn a small commission.
My journey began by hunting for a fabric that’s not only lightweight and stretchy but also looks stunning for this little Velvet pumpkin DIY.
Why Velvet Pumpkins?
Handmade velvet pumpkins instantly elevate any space with their luxurious texture. From cozy sofas to snuggly armchairs and cushions, velvet has made its luxe mark in every modern living space.
Whether you’re into neutrals or love a splash of color, you can personalize these to suit your decor. But hey, pick whatever colors sing to you – whether it’s rich oranges or classic blues, go wild with it!
Moreover, the pros use Silk velvet, which looks amazing, and I went for white, rustic gold, and lavender colors that perfectly match my home interior!
I opted for sizes ranging from 12″ to 24″, so feel free to choose various sizes for your handmade velvet pumpkin.

Other Materials You’ll Need for Velvet Pumpkins DIY include:
- A dinner plate and a salad plate (or any round objects for tracing like a hoop)
- Dried Pumpkins Stems (Tip: Keep an eye out at local markets or find them online)
- Beans OR Uncooked rice (for that lovely pumpkin weight and shape)
- Poly-fil or any synthetic stuffing
- A sewing needle (longer ones work wonders for this project)
- Heavy-duty hand-quilting thread
- Hot glue and gun
- A trusty glue gun and a few glue sticks
Step-by-Step Guide to Making Your Velvet Pumpkin:
Here’s how to make velvet pumpkins with real stems that rival the best in the business:
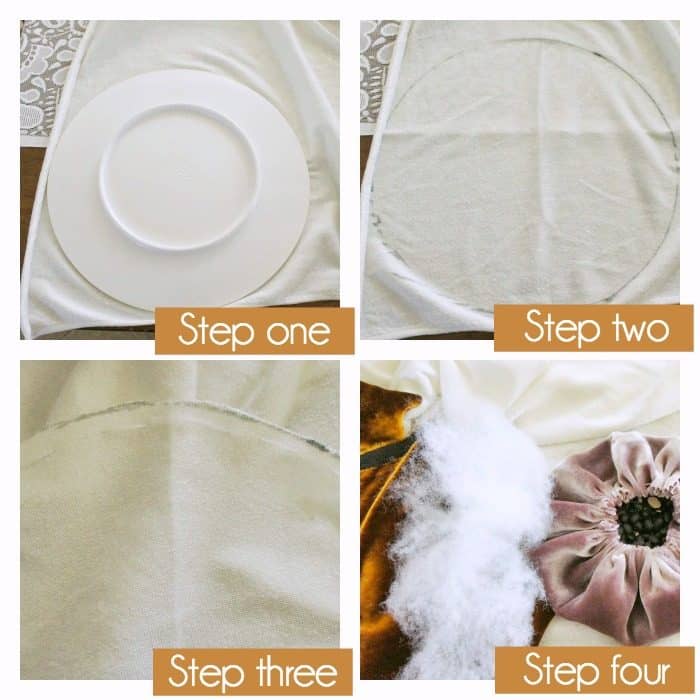
Step One: Prepare And Trace The Velvet Fabric.
First, Lay the fabric face down to avoid any marker on the visible side.
For easy circle cutting, place a large plate or another round object on the underside of the silk velvet as a guide. Now, trace it around using a fabric marker or chalk to form a perfect circle.
Here’s a tip: if you’re concerned about the marker bleeding through, slide a plastic bag or old newspaper underneath!

Step Two: Cut Out Your Circle!
Next, Grab a pair of scissors and carefully cut out your velvet circle into a circle of about 10 inches in diameter for a small pumpkin. You can increase the diameter for a larger DIY velvet pumpkin.
Don’t worry if it’s not 100% perfect – fall pumpkins in nature aren’t either!
Step Three: Now, It’s Stitching Time!
Opt for a long needle and thread it with a sturdy, hand-quilting thread. This will ensure your DIY fall pumpkins hold together, bearing the stuffing and beans without snapping.
A double thread of about 36″ will do the trick. Ensure your knot at the end is solid to prevent any accidental unraveling during the gathering process.
Now, Start from the underside so the knot is hidden, and sew a loose stitch from the circle’s edge. This will help you gather the fabric later.
Handy Hint: Do remember, we’re going rustic; precise stitches aren’t our goal. A rough 3/8″ from the edge, keeping your stitches about 1/2″ in length will work wonderfully.
Step Four: Stuff the DIY Velvet Pumpkin.
First, Form the Pumpkin Base.
Gently pull the thread so your pumpkin starts forming a little pouch. Pour some beans/rice inside until your pouch is about a quarter full – use about 4 tablespoons for small ones, ½ cup for medium, and a cup for large ones. This gives your pumpkin its characteristic base weight.
Then, Fill The Velvet Pumpkin Pouch With Poly-Fil (commonly used for toy stuffing) to eliminate any sagging from the bean weight and to give it a plump and squashy shape.
Small clumps at a time ensure even distribution and a well-filled appearance. You’d want to fill it till there’s a plush feel across all sides.

Step Five: Seal and Secure
Draw the thread tight, closing up your pumpkin. Don’t be afraid to really pull here – we want to fully close up the top. Secure it with several knots to make sure it stays tight.
Step Six: Bring Out the Pumpkin Shape and Details
Carefully inserting the needle through the top-center to the bottom-center of the pumpkin, and then again from bottom to top, helps create that classic pumpkin shape.
Ensure you pull tightly enough to create a gentle, natural-looking indentation on the top and bottom, going through 3-4 times to enhance the shape.
Caution Note: Be mindful of the needle; ensure you’re paying attention to avoid any pricking.
To neatly conceal your thread ends, push the needle back into the pumpkin, snip the end, and allow it to retreat back into the plush velvet.

Step Seven: Crown Velvet Pumpkins With Real Stems
Finally, It’s time to choose your pumpkin stem (real or faux, both work beautifully) and stick it on top of your velvet pumpkin using a hot glue gun. Just a dab of glue on the stem, press down gently, and there you have it: your very own adorable, handmade velvet pumpkin is ready to shine!
However, In the absence of real stems, air-dry clay can be a brilliant alternative. Shape it, let it dry, and paint it in enchanting colors that complement or contrast with your velvet.
A Little Tip: Every time you carve a pumpkin or use squashes, save the stems! They’ll come in handy for this project.
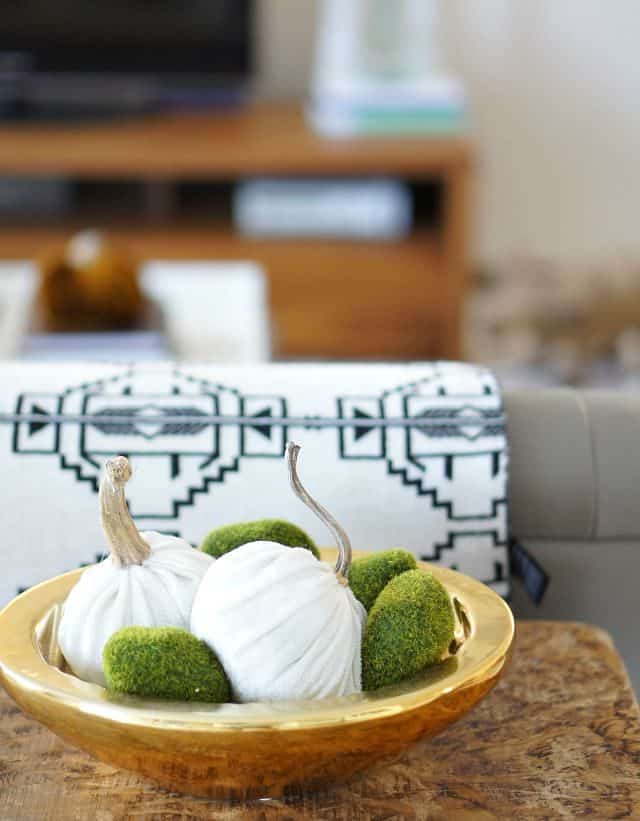
Super easy velvet pumpkins DIY. Right? You’ll love finding places to display them!
I’ve tried displaying these beauties in rustic bowls, on trays, or even solo on a mantle – they never fail to impress.
I hope you enjoy them as much as I do!

FAQs for DIY Velvet Pumpkin Tutorial:
How Can I Make Velvet Pumpkins Using Different Stems?
When creating handmade velvet pumpkins, you have the freedom to use any stem from a variety of vegetables, like squashes, pumpkins, or zucchinis. These can be found at the produce section, farmers markets, or even your own garden. The funkier the stem, the more unique your velvet pumpkins will be!
What’s a Quick Way to Dry Pumpkin Stems?
To speed up the drying process of your pumpkin stems for your DIY velvet pumpkins with real stems, simply place them in the oven at 200 F for about an hour.
What Should I Fill My Velvet Pumpkins with?
For the insides of your velvet pumpkins, you can use Poly Fill stuffing which is available at craft stores or online. Alternatively, you may repurpose stuffing from old throw pillows, use leftover yarn, rope, or fabric scraps.
For a bit of weight, add dried beans or rice to the bottom of your DIY velvet pumpkins before adding the stuffing, ensuring they stay put on your display.

How Do I Embellish My DIY Fall Pumpkins to Make Them Stand Out?
Embellishing your DIY fall pumpkins is a fun step where you can get creative! Consider gluing or sewing on sequins, tying a pretty ribbon around the stem, or using adhesive to sprinkle some glitter on top.
Feel free to add googly eyes or spray the top with craft adhesive and add fake snow for a winter theme. The possibilities are endless, and it’s a wonderful way to add a personal touch to your velvet pumpkins.

How do you make a DIY velvet pumpkin without sewing?
To create a no-sew fabric pumpkin, begin by placing a halved toilet paper tube at the center of a spread-out velvet fabric circle. Surround the tube generously with poly-fill stuffing, and optionally, add some dried beans or rice at the base for stability.
Then, gather and tuck the fabric into the tube, working around evenly to form a pumpkin shape, adjusting and securing it with your hands. Finally, apply craft glue to a stick, and firmly insert it into the tube as the stem, ensuring it’s steady before displaying your handmade pumpkin.
How Should I Display My DIY Velvet Pumpkin for Autumn or Halloween?
Your DIY velvet pumpkin can be the perfect addition to your autumn decoration or Halloween prop collection. For a stylish look, place these pumpkins in groups of three.
You can also display them in varying sizes and heights to elevate your home decor. Small velvet pumpkins can be arranged as a centerpiece on coffee tables, sideboards, or dining tables, helping you nail that coveted table-scaping trend.

Can I Make Boho Pumpkins with This Guide?
Absolutely! Your DIY velvet pumpkins can be versatile and fit numerous themes depending on your choice of fabric and embellishments. Be it boho, glamorous, spooky, or rustic – simply adjust the color scheme, type of stems, and embellishments to match the desired vibe.
For Boho Pumpkin, consider using macrame cord offcuts, rustic fabrics, or earthy-toned ribbons. Playing with neutral and earthy tones in your velvet fabric choice will also lend to a more boho pumpkin aesthetic.
Hence, this guide helps you understand how to make velvet pumpkins that can be customized to fit into any decor setting.

DIY Velvet Pumpkins With Real Stems Concluding Thoughts:
There you have it, a simple yet effective guide on” how to make velvet pumpkins” to bring autumn inside, creating a warm, seasonal atmosphere with your handmade velvet pumpkins. Remember to enjoy every step and perhaps even involve little hands in the process.
I genuinely hope you enjoy making these velvet pumpkins with real stems as much as I do. There’s something truly magical about transforming simple materials into elegant decor pieces.
Most importantly, feel free to add/subtract steps according to your personal crafting style and experience. Remember, DIY is all about making it your own, and this guide is just a starting point.
Make sure to check out 50 + Fall seasonal and holiday decorating ideas, DIYs, and free printables for the season.
I think you’ll just love these posts! They are some of my readers’ all-time favorites. With these ideas, you can find ways to display your DIY fall pumpkins, inspiration for Fall decor and DIYs, and my best rental-friendly decorating tips and DIYs.

- Best Curtains for Green Walls (Designer Tips & Color Ideas)

 Discover the perfect curtains for your green walls! From warm earthy tones to cool blues, find the ideal match for a stylish interior. Hey there! Green is my favorite color, and I’ve been decorating with it for years. It is one of the easiest colors to design a room with, and the perfect blank canvas…
 - How to Decorate a Paper Lantern with Brilliant Floral Accents
 Learn how to decorate a paper lantern with flowers on a budget for your next celebration or to update your home decor! Hi friend! I’m excited to share a DIY gem with you today, a beautiful floral paper lantern. And guess what? You can easily gather all your supplies at a local dollar store! Just…
 - DIY Plate Magnets: Personalize Your Fridge with Easy Homemade Decor
 Transform your fridge with DIY refrigerator magnets! Learn how to make your own magnets using dollar store plates and easy steps. Get creative now! Are you tired of the bland look of your refrigerator? Want to jazz it up with some magnetic decorations for refrigerators that reflect your unique style? Look no further! In this…
 - A Step-by-Step Guide for Creating An Aesthetic Bookshelf in Different Styles
 Embrace the bookshelf aesthetic! Discover creative tips for beautifully styled and curated shelves and easily transform your home. Having a beautifully curated bookshelf or bookcase is one of my favorite ways to showcase personal style and interests while also creating an inviting atmosphere in the home. But I know having an empty bookshelf or bookcase…
 - How to Choose the Perfect Curtain Size: Your Ultimate Guide + Free Printable Curtain Size Chart!
 Discover the secrets to perfectly sized curtains on a budget with a free curtain size chart and an in-depth guide for stylish window treatments. Have you ever found yourself standing in front of a window, unsure of what size curtains to choose? Maybe you’ve experienced the frustration of curtains that are too short, too long,…
Your pumpkins are absolutely gorgeous and I really like your details about how you actually made them. Lovely!
Patty at Home and Lifestyle Design
Thanks, I wondered how easy my tutorials and tips were to follow. I’m in love with my pumpkins and can’t wait to get my hands on some more silk velvet. =) I think I need a robins egg blue and black to go with the mix!
LOVE all of the Velvet Pumpkins! Thanks for an easy tutorial especially the bean trick! Pinned it.
Lovely! Do you know the exact colors of the fabric you used?
Thanks! I just searched for orange, purple, and white velvet on eBay. The white is actually panne-crushed velvet.
Where did you get the stems? I love the velvet pumpkins and will be trying to make real soon
Thanks! I went to my church’s pumpkin patch and asked if I could pick up any loose stems off the ground. I’ve seen them for sale on ebay or you could use squash stems. 🙂 Good luck!
I just made some pumpkins. I’m having trouble closing the hole that is left after pulling the thread. I stitched the hole closed. Is there something I am missing?
I believe I used hot glue to help secure the hole after I stitched it. 😉